Showing posts with label eggless. Show all posts

Sunday, August 26, 2012

Hazelnut Date Cake spiked with Cinnamon


I have been toying with the idea of a date and nut cake for a while now. and i frequently get requests from friends for baked goodie recipes that also cater to the vegetarian way of life. Since this blog is all about experimenting, helping out, making new friends and promoting a healthier lifestyle by (very, very) slowly but surely cutting down on the sugar and even gluten (but in no way compromising on the taste, if that is possible), this loaf is something towards that purpose.
and then, Poof!!! that was reality hitting me with a heavy thud:  i have a jar of beautiful homemade caramel sauce sitting on my counter top. and the little voice in my head was going something like this: how brilliant would it be drizzled over the precious loaf and toasted hazelnuts?! i know!!
 Yep, you guessed right, i succumbed.

P.S: If you are made of stronger stuff than me, by all means leave out the caramel sauce. The loaf really does not need it. The cake by itself is so moist you wouldn't believe the slippery fingers of butter or eggs were not involved. It is so easy, you would want to keep baking versions of it (walnuts? almonds?) It is so healthy, you wouldn't mind tucking in a few extra slices. The caramel sauce only enhances the taste for a sucker for caramel, me. 


Recipe adapted with changes from here

Ingredients:

-2 cups AP Flour
-2 teaspoons baking soda
-1/2 cup vegetable oil
-1 cup pitted dates
-1 teaspoon salt
-1/4 cup regular white sugar
-3/4 cup light brown sugar
-2 cups water
-1 1/2 teaspoon cinnamon
-1/4 cup toasted hazelnuts (halved) for garnishing the loaf - Optional
-1/4 cup caramel sauce for drizzling over the loaf - Optional


-Preheat oven to 175 C.
-Mix together the water, oil, salt, dates, cinnamon and sugars in a saucepan. Let it come to a boil, and then switch off the flame and let it rest for 20 minutes or till it cools.

-Sift together the flour and baking soda and mix it into the cooled mix by quarters. Stir to make sure there are no lumps. Pour into the baking pan, scatter the hazelnuts over the top if using them.

-Bake for 30 minutes or till done. Let it cool before slicing up.


On another note, we will be celebrating the festival of Onam this week, and as is customary, i will be making another traditional payasam to celebrate and to beat the blues of not being at home with folks during this week. Stay tuned!

Saturday, April 14, 2012

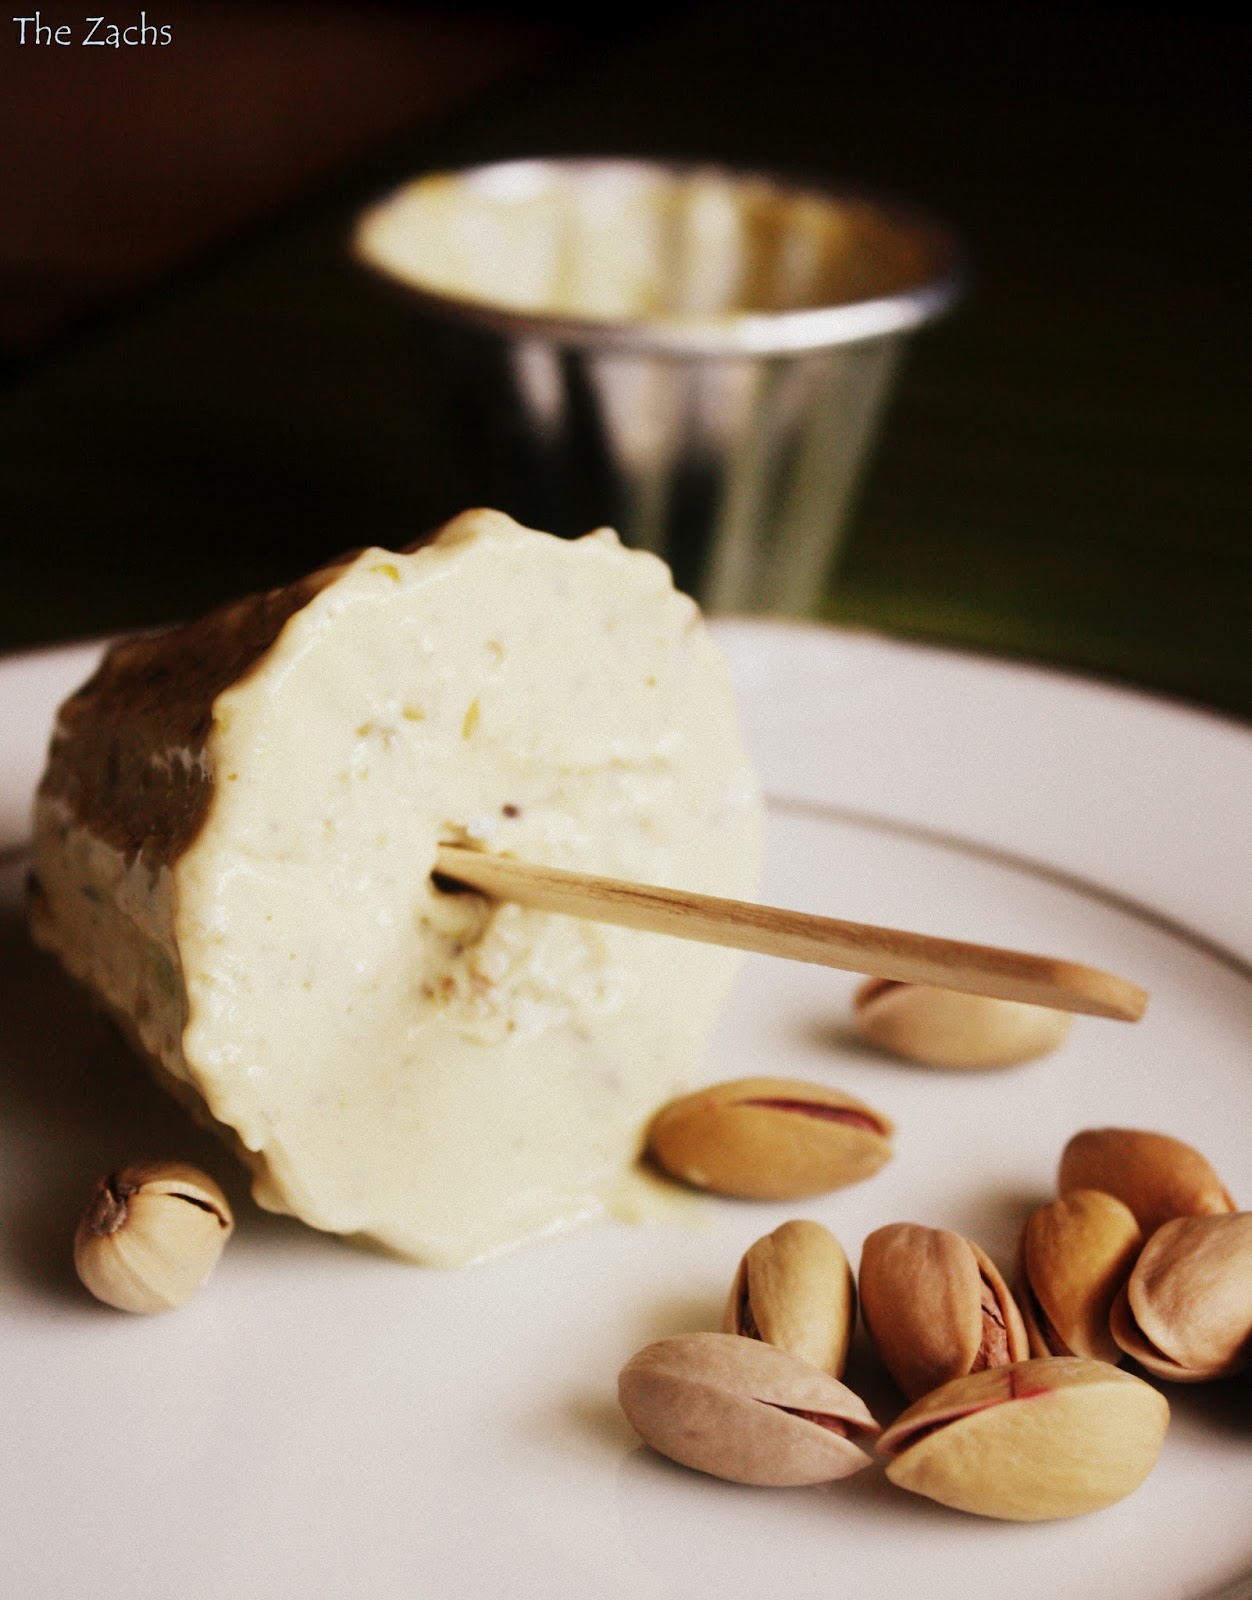
Pistachio Mango Kulfi - Mangoes are here!!!


aaaand..... Mangoes are here!!! The temperatures are soaring, true, but nothing screams 'Summer!!' more than mangoes. Nothing indeed. We adore this tropical fruit in all forms (best when eaten straight off the seed, drippy hands et al.) and when i say 'we', that includes Oreo/sous chef. She loves it so much, she is one of the excuses we make to buy more mangoes :P. Granted, they are not at their best yet, and are very expensive in the market, but i could'nt resist and it was not regretted. Not one bit!


The recipe was adapted with tiny changes from here and needless to say, it is 'knock-your-socks-off' yum. Thanks Deeba! :) Store bought kulfis are appreciated in my home and it's one of the few things that non stick adores that has nuts in it. and i'm not a big fan of most Indian desserts but this recipe is a major major exception and we may have a new fav in the frozen comfort food aisle people! So, without further ado, we kick off the mango season this year with a delish, 'gimme more' ice cream that uses the brilliant fruit. Here's to many many more!


You will need:
1/2 L Milk
1/2 L Fresh Cream
200 ml condensed milk
Ground Cardamom - 3 pods
Sugar to taste
1 cup shelled and unsalted pistachios ground to small bits in the blender
1 large mango's flesh, puréed

How you go about it:
Give the pistachios a quick whir in the blender and make sure you do not make them a paste but remember to scrape off every bit of the nuts from under the blades et al, they lend amazing flavor and act as a thickening agent as well.
Place a thick bottomed pan on the stove and mix the half and half and the nuts and the ground cardamom and turn on the flame at medium. As the mixture heats up, add the condensed milk and remember to keep stirring. Do a taste test and check if it's sweet enough and if not, add additional sugar by the spoonful, checking after each stir.
Continue to stir till the mixture thickens, that will be in 30 to 35 minutes.


Once it has thickened, take off the flame and let it cool for 20 minutes. Add the mango purée and give it a good stir to mix it all in.
Pour into the moulds and keep in freezer to freeze. After thirty minutes, place the kilfi sticks in each mould and return to the freezer. Freeze overnight or at least 8 hours before devouring.
A quick tip to unmould: Butter the moulds lightly before pouring the mixture in. Another option is to dip the full moulds quickly in warm water to unmould.

Enjoy your kulfi! :)


Thursday, December 22, 2011

Vanilla bean loaf

                                
Here's sending a vanilla bean loaf your way, a break from all the chocolate. So whats so cool about this recipe:  
works just as great in a circular cake tin or a loaf tin,
has no eggs or butter in the recipe!!
is loaded with fresh vanilla scraped from the pod (!)
is an awesome cake to pair with jam, nutella, coffee, milk or a plain grey afternoon
you can see the vanilla peek through the cake! (notice the gorgeous tiny black specks in the cake?) 
This cake yields a moist cake with a fabulous crumb.

                                                  
The recipe was adapted from here with a few changes of my own.
You will need:
1 cup + 3/4 cup AP flour
1/4 cup Corn flour
3/4 cup powdered sugar
1 teaspoon Baking powder
1/2 teaspoon baking soda
1 cup buttermilk
1 tablespoon less than 1/2 cup vegetable oil
1 teaspoon vanilla extract
1 vanilla bean to scrape the inside goodness
-Pre heat oven to 175 oC and butter the pan/tin that you will be using and keep aside. Sieve maida with corn flour to ensure it is mixed evenly.
-Mix the buttermilk and sugar in a separate bowl. Add the baking powder and baking soda and let it rest for 2 – 3 minutes.


This mix will froth. Add the oil and vanilla extract and blend for 2 minutes using a hand blnder.

Slit the vanilla bean sideways and using a shaped edged, thin and handy knife, scrape out the vanilla from inside and add to the buttermilk mix.Continue to blend till it becomes a homogeneous mix.

Add the flour a little by little and continue to mix till incorporated.

Pour into prepared tin and place in the center of oven. Bake for 35-40 min or till it passes the skewer test.
Allow to cool in pan before turning it over onto a plate. Once cooled, slice and enjoy with a spread of your choice.

Is that enough nutella? :P

Tuesday, November 8, 2011

Chocoholic's gelato


I may need an intervention. This may be getting out of hand. We may be in trouble. This is, lemme think... the 5th batch of gelato in a little over a month. But heck, we are loving it! The inventory in the freezer is replenished as soon as we see gelato levels dipping dangerously low. it's so obvious we are tripping on gelatos. But this I.N.S.A.N.E.L.Y good chocolate gelato leaves us asking for more. and hence: The ultimate chocolate gelato a.k.a Chocoholic's dream come true. Tadaa!!


What puts this gelato in a whole different sphere of legitimate and awesome gelatos is its texture and the richness. The texture is to die for, creamy and dense. The chocolate is rich and so right. So you have to make sure you use the best quality chocolate that you can lay your hands on. The hint of the gianduja can  induce a tad bit of a happy-high. But hey, who's complaining?


The recipe has been adapted from here with changes. Mr. Lebovitz, i owe you. Big.

What you will need to make the ultimate scoop of chocolate gelato:
2 1/2 cups of milk
¼ cup condensed milk
¼ cup fresh cream
3 1/2 tablespoons corn flour
1/3 cup Cocoa powder
80 g dark chocolate, chopped.
1/3 cup sugar
2 tablespoons of Chocolate liqueur (I used gianduja)


How you go about it:
Take ¼ cup of the milk mentioned in the ingredients above and whisk in the corn flour. Keep aside till called for.
Heat the milk and sugar in a saucepan and bring it to a boil, add the condensed milk and stir it in. Bring the temperature to a simmer and add the cream. Keep stirring till it is all dissolved.
Add the cocoa powder and whisk gently to blend it all in. (Gently because it may fly around a bit otherwise!)
Once it is all blended in, cook for a minute. Add the corn flour+milk mix (make sure there are no sediments of corn flour at the bottom before pouring, so whisk again before pouring) to the saucepan and mix well. Keep stirring for three to four minutes on a very low flame to ensure nothing sticks to the bottom of the pan and it cooks uniformly.
Take off the heat and add the chopped chocolate to the mix. Stir occasionally to make sure the heat from the milk mix melts the chocolate.


Once melted, stir in the liqueur and the chocolate gelato is ready to be frozen. Pour into a flat bottomed, freezer friendly container and freeze till set. You wont have to blitz it with the blender to break up any ice crystals that may form. I didn’t have to. If you do think your gelato is not as creamy as it should be, do the drill of blend-freeze-blend-freeze. Mine was completely, most superbly creamy without it! A dream I tell you, a dream!

Saturday, October 22, 2011

Nuts about nuts : Pistachio Gelato


know what, i think i know why green and its various hues have always been my favorite color. Ever since i can remember. i mean, i have had fancies for leaf green, parrot green, turquoise green, bottle green, aqua green, teal green, charteuse and pista green to name a few (You know how gorgeous these colors look in the staedtler color pencils array right - its fabulous!). To expound on the last point: Ah, the color of good (read middle eastern) pistachios! The taste is synonymous with growing up in Dubai where nuts are a staple. It was a permanent fixture at home, in its raw unshelled glory or otherwise. My brother's favorite flavor of ice cream was the Pista. All to say, this recipe was waiting to happen! and i'm loving every lick of it. :D


A note about the gelato: It is more creamy than the previous attempt and i attribute it to the creaminess of this fabulous nut. Also, it makes you want to have more and more. So there, you are warned!

The recipe has been adapted from Mr. Lebovitz's and Aparna' recipe.
What you will need:
1/4 cup shelled pistachios
2 cups milk
1/2 cup cream
1 teaspoon of lemon juice
1/3 cup sugar
2 1/2 tablespoons corn flour
a (big) handful of roasted and chopped (unsalted) pistachios to garnish


First we will need to make the pistachio paste which may sound complicated but is the coolest thing eva! Boil some water in a saucepan and add the pistachios in. Once it boils, switch off the flame and drain the water. Run under regular water to cool them and once cool to touch, remove the skin with hand.
Dry them best way you can on a paper towel and blitz these nuts in the grinder till you get as powdery as possible. Add a couple of tablespoons of milk from the milk required and continue to blitz till you get a smooth paste. Add the lemon juice, mix and keep aside.

Take another quarter cup of milk (also from the milk in the ingredients list) and dissolve the corn starch in it. Whisk to ensure none of it sediments in the bottom.

Bring the milk and sugar to a boil. Once it has, reduce the flame and add milk+corn flour mix and whisk in. Make sure it becomes a homogeneous mix. Continue to whisk till it reaches the custard like consistency (coat-the-back-of-your-spoon stage) and a minute after. Make sure you keep whisking it and that flame is on low, else you may potentially end up with burnt custard coating the bottom of your vessel. and you do NOT want that! (experience talking)


Take it off the flame and add the cream in and whisk. Allow to cool to room temperature before adding the pistachio paste. Whisk till smooth. Pour into a freezable flat bottomed container and pop into the freezer till it freezes. Once it has, blend the gelato using the blender to break up the ice crystals and pop back into the freezer to set. Repeat this process thrice. After the last time you blend it, add the chopped roasted pistachios and distribute evenly. Dig in!


P.S it is physically impossible to restrict the tasting to a few (ahem ahem!) spoonfuls of the gelato when blending it the various times that you have to. Really! Go on, try it for your self.  and say goodbye to those icky looking cardboard boxes (Eeww!!) of ice cream or the not-so-bad-looking ice cream tubs for good! :)

On another note, Happy and safe Diwali all! Spare a thought for the ozone, your carbon footprint, your finances and the poor hapless animals that are subjected to your torture of pyrotechnics before you burst the next deafening cracker (!!*#@$^&!!). The true spirit of Diwali i would like to think is in lighting diyas and eating loads of papdi chaat and gaajar ka halwa :D. Happy Diwali!

Thursday, October 20, 2011

Vanilla Gelato and a triumphant beginning


Whoever said you need an ice cream maker to make a gelato? hogwash! Who said u need egg to make creamy ice cream?  Baloney! and you cant make delish ice cream yourself? Nonsense! If that does not motivate you enough, i do not know what will. My mom used to make ice creams when we were growing up and we used to love it, crystallized in parts as it was. We used to badger her to make more. And somehow that taste lay in a corner of my mind amidst so many other childhood memories that i associate to smells and tastes till i chanced upon this. and i knew i had to try it. Thanks Aparna for rekindling these old fires! :)

I decided to go simple and do the ultra basic stuff as it was my first time. Now that i know this is a winner, i have already concocted various sinful combinations in my head.

What you will need to make a box of Vanilla Gelato that will feed 3 very passionate gelato lovers or 6 regular mortals (you may just hop over to the other side after this, mind it!):

3 cups milk (i used toned to justify the name 'gelato' but you could use regular full cream milk and still call it one)
100 ml cream
3 scant tablespoons corn flour
3/4 cup vanilla sugar
1 average length vanilla bean

How you go about it:

-Keep aside a quarter cup of the milk and keep aside till further use.
-Pour the remaining milk into a saucepan, add the sugar and and bring it to the boil. Add the split and chopped vanilla bean along with the scraped out vanilla goodness from the bean. Lower the flame and let the milk simmer for about 7 minutes or so. Cover with lid and keep aside for an hour while the vanilla is infused into the milk.
-Strain the milk to remove the bits of the vanilla bean and pour the milk back into the saucepan. Bring it to the boil and let it simmer.


-Add the corn flour to the quarter of milk that was kept aside and whisk to ensure there are no lumps.
-Add this mix to the saucepan of milk and stir continuously to ensure no lumps form. Whisk over the flame till it reaches a custard like consistency and when the spoon is lifted, it coats the back of your spoon.
- Take it off the flame and allow it too cool and make sure you stir it to prevent a skin from forming.
-Add the cream to this mix and whisk by hand to ensure it becomes a homogeneous mix.
-Pour into a sufficiently large and flat bottomed box that can be kept in the freezer and freeze till set.
-Once set, beat the ice cream till its mushy. This is so that we break down the crystals. Return back to the freezer to set. Once set, blend/beat it again till mushy. Repeat this process thrice and you get the creamiest, best home made ice cream made without an ice cream churner!

-Once set, you may drizzle chocolate sauce and dulce de leche or any other sauce of your fancy. That's the beauty of a vanilla gelato, it complements almost anything.
and there my bellissime people is your Gelato  :) This is only the beginning of many more to come!

Thursday, September 22, 2011

Genius Pick-me-up: Granola bars


 It is no secret that i enjoy a snack with Oreo while mindlessly recounting office stories to her when i get back home after a fricking long and borderline murderous cab ride after office. And that snack is important to us. It's mostly something that does not go down well with my ethics of 'minimum junk food'. So to ease that conscience and without compromising on my sweet tooth craving, i put together some of my favorite ingredients and made a truly genius piece of pick-me-up. and named them granola bars. They already exist in the supermarkets aisles here in India BUT as it turns out, i do not like them. They are saccharine sweet, sticky for the wrong reasons and if i did'nt mention it already, excessively sweet! Not my kinda granola bar. Hence my own version.


My own version is egg-less (this is a first! Yay!), AP flour free (also a first, yay yay!), got goodies like almonds and honey plus it's got minimal sugar and butter. Just mix 'em up and pop into the oven. Really. The simplicity will blow you away. The result, better still! Thought balloon: Maybe i'm getting on the 'eat healthier at-least-once-in-a-while' bandwagon. Bet my mom will be thrilled.


The dry ingredients:
Oat flour - 1/3 cup*
Oats - 3/4 cup
Crushed Corn flakes - 1/4 cup
Puffed rice: 1/8 cup
Slivered Almonds: 1/3 cup
Whole almonds: 1/4 cup
Raisins: 1/4 cup
Chocolate chips: a handful
Salt: 1/4 teaspoon
Cinnamon powder: 1/8 teaspoon
*You can make the oat flour by simply blitzing in a mixer 1/3 cup oats for less than half a minute! :)

Not so dry ingredients:
Brown sugar: 1/4 cup
White sugar: 1/4 cup
Honey: 1/4 cup
Butter: 3 tablespoons
Water: 2 tablespoons


How you go about it:

Preheat the oven to 170 C.

Line a tin with aluminium foil and make sure the sides overhang. Butter the foil.

Melt the sugars and butter over a low flame. Add in the honey and water. Take it off the flame once the mixture starts to boil. Keep aside.

Sift together all the dry ingredients.

Make a well in the middle of the ingredients, add the sugar/honey syrup into the dry ingredients and mix as well as you can so that you wet all the dry ingredients and everything is evenly dispersed.


Bake in a preheated oven for 30 min at 165 C or till the colors changes to brown. Pop out of the oven and let cool completely in the tin. Remove from the tin using the overhanging paper on the sides. Cut into even bars and enjoy!

P.S: The target audience here is the people who make the lousy granola bars for the supermarkets, people who love to eat on the go, people who love to snack on something while doing chores, people who pack snack boxes for little ones or selves, to be mothers, already mothers, fathers, bosses, teachers, grand folks... you get the drift right. It tastes really good as is, with cold yogurt or with hot milk, when you are pooped, after a gym workout, a brain numbing meeting or after giving your dog a bath. It's also a great thing to cut through the monotony of deep fried goodies. The possibilities are endless, truly!